Wednesday, February 29, 2012

I Do Not Like

 After spending three days making these letters... "before you can think", I have come to a conclusion.
I do not like them.

I do not like the letters with all different colors in each letter. I think they look choppy, and I don't think they flow well. I think you have to figure out what the letters are before you can read them, and I think that's bad.

I don't mind having different colors in each letter if you make the letter look like a letter, and if your eye "reads" the letter as a letter FIRST, and then sees the different colors AFTER. You may disagree, but you won't talk me out of it.

 "Think" is not bad. I don't like the crossbar on the T, but the rest of the word is OK. Some individual letters may stay, but for the most part, these are destined for the dud "misfit" bin.


Besides, this cacophony of bright mismatched letters may draw attention away from the black box that is the true center of attention in this quilt.

Still though, this hasn't been a waste of time. Now I know for sure I don't like it this way, I can carry on!

Tuesday, February 28, 2012

How I Work

 When you make a free pieced quilt, your sewing studio generally looks like a bomb went off inside. There are fabrics e-v-e-r-y-w-h-e-r-e and it can be really stressful to work in.  I've found a way that works for me and thought you might like to see it.

Since my new quilt (working title: "Black Box") is using so many colors and fabrics, I find it's easiest to cut a lot of strips ahead of time. So I do. I stack up the fabrics, and cut several strips, generally about 2" wide. I don't worry about straightening out the raw edges, I just make it wide enough to work with.

 I keep these colored strips in a bin on the worktable across from where I sit. They are easy to see, and easy to reach. I keep them in a jumble, because they often fall together making color combinations I might not think of on my own.

When you do a free pieced quilt, you use a LOT of fabric for your "background." I've bought over 8 yards of the putty colored fabric for the Black Box quilt. It's been washed, and folded so the selvages line up, then folded accordion style and it sits on the left side of my worktable. If I need any, it's a simple matter to unfold it, cut a long strip, and then fold it back out of the way.  I keep my long cutting rulers nearby.


On my right sit my pins, rotary cutter, a marking pencil and a large plastic bin (about the size of a shoebox) for the scrap pieces and strips of the background fabric.  I'll be using a lot of this color, and this bin keeps the mess somewhat in check.  The small decorative box is used as a desktop trash bin.

 On the spare worktable on the right, I keep all the fabric I'll want to use for this quilt. For me, if it's out of sight, it doesn't exist.  If I need a large piece of anything, it's close by.  Here you can see the very light pastels, the light pastels, some WOWs and other fabrics I am considering for the quilt.

Here's what my worktable looks like. Since my back has been bothering me, the table is now level, and I do my work sitting down. My ironing table is right behind me, so if anything is wrinkled, I just turn around to press it.
Here I have fabrics laid out for the next letter.

Monday, February 27, 2012

Letters

I've sewn together the word "think," and I'm working on "before,"
 I usually start with the first letter in the phrase, but this time I started in the middle. 
I'm having fun mixing up the fabrics.  These letters are slightly darker than the ones in "out of the box".

I spent most of the weekend cleaning the house and doing all the things I'd been putting off for weeks. Now I can devote my free time to working on this new quilt. Woo Hoo!

Saturday, February 25, 2012

Think

I will be making more letters for the Black Box Quilt.  Here are the fabrics I have selected for THINK!  I also realized I was making the letters blend one into the other like a rainbow, and I don't want to do that.  I want to spread the colors around, so more letters for the "dud" bin!

I've also decided the house needs neatening up, it needs dusting, and I have to vacuum (or as Millie describes it, "drag the rug sucking monster around.")

Thursday, February 23, 2012

The Wedge

Thank you Judy, for helping me work out how to assemble these elements. Judy suggested thinking of a melon, and wedges. It was only when I realized the letters could be part of a wedge did the whole thing make sense.  The other thing that helped me was dark crochet cotton taped to the design wall to help me figure out how much space I had to fill, and where my lines were.

Now that I know how I'm going to assemble these pieces, I have to work on the other letters and elements that will be part of the quilt. I can assemble it all later, after I've got a final arrangement. 

I was discussing the quilt today with one of my coworkers and she said  the "you have to start with a box" had to be all straight, and probably very regular and almost gridlike.  It's an idea worth considering.

Thanks all, for your observations and suggestions!

Wednesday, February 22, 2012

What The Camera Sees

This photo was taken with my digital camera.
This one was taken with my iPhone, in the same lighting situation.

Interesting, isn't it?  The truer colors are on the top, but the bottom one really shows the contrast between the cream background and the pure white diamonds that will be coming out of the box.

Now even though I told you yesterday that I didn't mind not knowing how this is going to turn out, somebody ought to whack me upside the head from time to time. I really don't mean to sound like a pompous ass.  Frankly, it really pisses me off when I don't know what the hell I'm doing. I hate not knowing.

I think of that damned semicircle, and how the hell am I going to fit all those pieces together without sewing into any corners. How the hell am I going to join the letters together? I'm coming to the conclusion that I might just sew one giant curved seam and be done with it. (It's not like I don't know how.)  And then, what do I do with the NEXT line... "you have to start." Is that going to be in a semicircle too, (but upside down, so the black box is in the center) ?? And then what do I do with the start of the quote, "Before you can think..."


Crap, I have no clue. I'm going to bed.


PS, Judy, I am so sorry I got your name wrong.

Tuesday, February 21, 2012

This and That

1. Now that Downton Abbey is done Season 2, I just don't know what I am going to do with myself!! I was thrilled that Matthew and Mary... (what, you didn't see it? Okay, I won't give it away then.) Anyway, I guess I will get caught up with my reading. And count the days until Season 3...

2. I sat down last night and paid the bills.  All of them. I feel so virtuous. Now I just have to reconcile the bank statement, and I'm pretty sure I'll be able to walk on water.

3. Jean, the white stuff on the background of the putty-colored quilt will be the stuff that is flying out of the box.  Imagine firecrackers, confetti, stars, butterflies... you know, stuff like that.  That's the plan, anyway. We'll see how it looks. And if it doesn't "work," I'll try something else! I think free piecing is like quilting without a net. (You know, "LEAP, and a net will appear.)

Back to #1, I thought Violet's remark to Richard Carlisle, "Do you promise?" was absolutely priceless, and I practically flew off the couch, cheering, when she said it.  You should find Downton Abbey and watch it. Be sure to start at the beginning of Season One and watch them all in order. I promise you'll enjoy it. Maggie Smith has the best one liners, and delivers them perfectly.

Here are some of the best "Maggie Moments" from Season One:


You can find the best from Season Two on the Downton Abbey website, here, and they are just as funny:

Monday, February 20, 2012

Out and About

I started making the letter blocks a bit bigger so I could start joining them together.  Here you may see the small pure white squares surrounded by the eggshell fabric above the o's and the u. In this photo the pure white fallouts in the o's are clearly visible.

This whole thing with the close values (bright white on eggshell) is still kind of an experiment. I'm not quite sure if it will look the way I want it to, but I'm willing to take the risk, because for me, the process is more important than the end product.

Besides, I'm all about pushing the envelope and not playing it safe. You never know what you can do until you push yourself to take a risk. It's only fabric. It isn't gold.

Saturday, February 18, 2012

Box Work

I'm back at the box.  I wanted the words "out of the box" to flow like a circle around the black box, so I got out my beam compass and drew out a large circle. The I cut it out of paper and put on on my design wall (ergo the blue tape).  I was then able to position my letters, and trim them down to just about the way I want them to look. 

Obviously sewing them together is going to be a challenge.  That won't happen quite yet. I want some sprinkles of pure white "confetti" coming out of the box and floating around the background.  I've done a little testing, and a white square 3/4" is too small to be clearly visible, so I have to continue to work on that idea. In the meantime I made a pure white butterfly (with a slightly blue-gray body) and a white flower with a pinkish center. Those two elements show up nicely against the creamy eggshell background. 

Those of you with eagle eyes may notice I have redone all the letters with "fallouts" (o, e, b) and replaced those center pieces with pure white (instead of the eggshell cream).  The point is to make your eye connect the white of the opening in the box with the other white objects in the quilt.

Friday, February 17, 2012

Four Seasons Finito!

It's finished. I never made it to my Mom's house yesterday, so I'll bring it over to her this weekend so she can enjoy it and show it off to her students next week before it travels to Quilted Threads in Henniker NH. I'll be teaching a class on making wonky houses and trees on Saturday May 5. Hope to see you there!

The finished quilt is about 44" x 60"


Now I can't wait to get back to the box quilt!

Thursday, February 16, 2012

Almost

It's almost finished, but not quite. I have about 30" to sew on the right side, and I still have to add the hanging sleeve to the back.  It is quite handsome, if I do say so myself. It's amazing how much better it looks without all the extra batting hanging out. It's also nice to see choices I made for the inner border, outer border and binding were the right ones.

I'll be bringing it over to my Mom's before I go to work today, and picking it up later.

Selvage Fairy, my Mom teaches drawing.

Wednesday, February 15, 2012

One Stitch at a Time

I've been sewing the binding on the Four Seasons quilt.  I've been watching the Westminster Dog Show on tv while I stitch. I'm about half way around.

My Mom told me to hurry up and finish it so I could bring it to her house so she could show her students on Thursday.   Ma, I love you, but my hand hurts! I did one short side and one long side last night and I was sore!  She says, "Well you could always bring it to me NEXT week."  Sigh.

Tuesday, February 14, 2012

Binding!

 It's rare I have -two- quilts that need binding at the same time. The Four Seasons Quilt,
and the Red Letter Alphabet, which arrived over the weekend.
 I found a nifty app for my smartphone.  It's a collection of quilting calculators. 
 This one is from Robert Kaufmann and it's free. Obviously I know how to calculate yardage, but this is going to be handy when I'm at a quilt shop and I'm having analysis paralysis.

Happy Valentine's Day!

Sunday, February 12, 2012

Words

I love quotes and collect them. When I finished the last Rules quilt, I didn't want to do another quilt with letters for a while.  So I made the Four Seasons quilt. I wasn't really thinking about another letter quilt. In fact, I was kinda lost without a project until I decided to make the Red Sticks.

Serendipity stepped in. After I wrote the post about Picking Up the Pencil, I picked up a book by Twyla Tharp called "The Creative Habit." 

I'd had the book for years, but this time when I opened it up, the title of chapter 5 really spoke to me. It is:

Before You Can Think out of the Box, You Have to Start with a Box.

It really hit home, and instantly I knew it would be my next letter quilt. I started making notes about it in my little sketchbook, and even drew a rough layout. I didn't immediately start buying fabric or figuring out how I would go about making the quilt though. I didn't have enough information. The idea needed to gestate, to percolate, to grow, to develop.

I had some basic ideas of color though. I knew I wanted the "magic box" to resemble a magician's top hat, I knew I wanted it to be black, I knew the opening had to be a bright white and that white had to be used sparingly in the quilt - that elements coming out of the hat could be bright, but everything else would have to be a bit duller.  Should the background be dark? I didn't know.

After a couple of weeks, I ordered some creamy batiks and (gulp!) an "Ultimate Pastel Batik Packet" of 25 pastel batiks (for $70USD).

After wrestling a bit more with ideas, I finally realized that I would not have any answers until I started sewing, so I made the magic box.

I was thrilled when readers "got it" right away by seeing it both as a stylized box and a magician's hat, which was precisely what I was going for.

Last night I made some words.  These haven't been trimmed down to size at all. They will be a lot thinner. (Think Make It Work)


 This is one of those quilts where I sorta have an idea of what I'm doing, but the idea isn't complete, finished, carved in stone.  I sorta know what "Before you can think" will look like, and I am pretty sure I know what the background fabric will be, but that could change. I have some ideas to do for the stuff that comes out of the box, and how I might do some of that stuff, but I'm not quite sure.  I know what the "starting" box will look like, and I've chosen fabrics for it.  That leaves a lot unplanned. I don't know where it will go, I don't know how it will turn out, and I may scrap everything I've done if I get a better idea.

None of which bothers me one bit.

Stay tuned!

Saturday, February 11, 2012

New Quilt Preview


This is the centerpiece of my new word quilt and I am very excited about it. I won't reveal the quote just yet (but yes, the word "out" will be used.)

What does this look like to you?  What does it remind you of?

Friday, February 10, 2012

How Big?

OK! This should put to rest once and for all how big the Four Seasons quilt really is.  This is me standing in front of it. I'm five feet tall (152 cm).

Yes, the photo is fuzzy. This is what happens when you set your camera on the bookcase at one end of the room, set the auto timer and hope for the best.  You know what I look like. You know what the quilt looks like, but here is a view into my house. I've pushed the dining room table over so I could lay out the Red Sticks blocks on the floor.  Yes, those are CD's at the top of the room, hot glued to the burlap I put up years ago to cover the ghastly fake flock wallpaper. Yes, those are Christmas lights strung around the top of the room. Yes you can see into my school bus yellow bathroom. Yes, I painted the colorful dry sink on the right, and that's a portrait of my son on the wall above it. The little quilt on the left was from Gemma who lives in Wales, UK which I received in one of the early Doll Quilt Swaps.

In the next few days I'll be finishing up the Four Seasons Quilt, and I'll sew up the Red Sticks blocks.  I've got my next letter quilt planned, and if it comes out the way I hope, it'll be a doozy.

Stay tuned!

Thursday, February 9, 2012

Four Seasons Quilt

Feast your eyes.  You can click the photo to enlarge and then click again for lots of details.  It's so interesting to compare to the finished flimsy, below.

The quilt is about 48" x 60" or so.

Wednesday, February 8, 2012

Evolution of Out

You will see more of this, but not anytime soon. It is part of an idea I am rolling around in my head. 

Tuesday, February 7, 2012

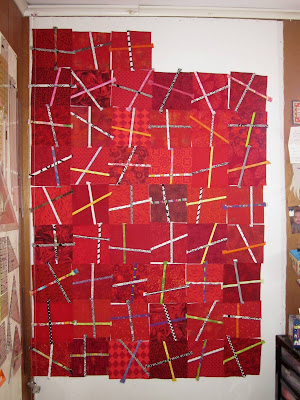
All The Red Sticks

Here are all 63 of the Red Sticks blocks laid out on my dining room floor.I'm not completely committed to this layout, but so far so good.  I'll look at this photo for a while, and if I want to move things around, I will.  Around these will be a narrow strip of one of the black and white fabrics, then all these blocks will be surrounded by red-on-red blocks, then a red binding and a red backing.


Monday, February 6, 2012

Red Sticks Blocks

I trimmed all the blocks for my version of the Red Sticks Quilt. I may lay them out tonight and start sewing them together.

Or not. My Four Seasons quilt is all quilted, and is visiting my friend Julie for a little while before it comes back home for me to finish.  Julie's got some great photos, so you should go over and check out Chris's fabulous free motion quilting.

Saturday, February 4, 2012

Red Stick-a-thon

Here are all the Red Sticks blocks I have so far, 51 of them. I need 12 more, then I start the red-on-red ones for the "border."  Why so many more?

When I realized that offsetting the strips made the blocks smaller, I had to adapt. I had originally planned on 8" finished blocks, but I won't get them that size, they'll be about 7-1/4" finished.  I had a particular size in mind, and to get that size, I needed more blocks. So today is Red Sticks Day.  If I can, I want to make ALL the blocks in time for The Big Game tomorrow.  I will trim my blocks down to size while I "watch" the game.

Otherwise I'm pretty sure I won't have any hair or fingernails left by the end of game.

Friday, February 3, 2012

Winter Sneak Peek

Chris has done her magic with my Four Seasons quilt, and it will be on its way home to me soon.  She took this picture while the quilt was being quilted, and I want to share this luscious little tidbit with you all.

It's pretty awesome and I am very excited!

Thursday, February 2, 2012

More Red Sticks

 Now I have 30 red sticks blocks. I need 18 more for the center, then I will make 32 red-on-red for the "border."

 I really like this block, with the red fans, the black and white stripes and the orange fabric that echoes the stripes in each.
 This is another block where I placed the patterned piece quite deliberately.
I like this block too, with the obvious mis-alignment of the green strip.

Remember I said I need 18 more blocks for the center of the quilt? Here are the six pinks, the six blues and the other fabrics I will use to make up those 18 blocks. You can click the photo, then click again if you want to see the fabrics in detail.

I want to move quickly, because Chris has finished quilting the Four Seasons quilt, and I should see it sometime late next week. I will be eager to finish it so I can bring it to Quilted Threads for display.

Wednesday, February 1, 2012

Red Sticks Update

I have made 27 Red Sticks blocks. I started with 8-1/2" squares of red fabric.

Here are a couple of the newest blocks.  This one is an homage to my pal Julie. She sent me this red fabric, loves black and white as much as I do and is crazy about purple.
I am particularly fond of this next one.
You don't think the fabric placement was an accident, do you? Because, it isn't. I really did want it to look like that. I love putting these kinds of "in jokes" in all my quilts.


By the way, I'll be teaching a class called, "Houses and Trees, O My!" at Quilted Threads in Henniker NH on Saturday May 5th, and a repeat "Letter Play" class on Saturday June 23rd. Click here for more information.