Sunday, June 30, 2013

Busy, busy, busy

I may not have been doing much sewing the last day or two, but I have been very busy.  First, I moved some stuff around in my container garden. I needed to put down some garden cloth to keep the weeds & bugs at bay.  That meant moving everything. It looks much better now.


I have two Early Girl tomato plants, two Big Boys, and one cherry tomato plant. I have one red bell pepper plant, six pots of Basil, and three of Thyme. I also have Tarragon, Oregano, Marjoram, Thai Basil, Rosemary, Sage, Mint, Chives and Parsley. I put marigolds in the garden because the aphids prefer them to the tomatoes. There are also two window boxes filled with lettuce. There is also a big planter filled with Nasturtiums.

I did some research on airfare to St Louis for Quintessential Quilt 2013 in October. It's still a bit too early to buy tickets, but I did make my hotel reservation.

I've been watching Wimbledon, and what a tournament! Seven former #1 players in the world were all knocked out by the second round!


I did finish the Spools Quilt, and got the backing ready. It is now packed and ready to go to Chris for quilting and magic.

The house is clean, the dishes and laundry are done. The week's menus have been planned and the groceries and errands have been done, the bills are paid and everything is entered into the computer.

NOW I can go have fun in the sewing studio!  w00t!

Wednesday, June 26, 2013

Around and Around the Spools

I finished sewing up the Spools into a flimsy. It isn't perfect, but it doesn't need to be. It's going to be thrown across the back of a couch, and valued for the Sheer Love Units (SLU's) it will provide.

But it needs a little something something. Actually, I have a few ideas.  Let's review, shall we?
 The green is lovely. But it doesn't really bring anything different to the party.
The red, however, packs quite a wallop. Red is the opposite of green, so having it there makes the greens pop. Also, there are enough red touches in many of the "cream" fabrics to connect this color to the body of the quilt.  This inner border won't be larger than 3/4", so it's going to be just enough to give the quilt a little kick.

This brown batik will be the outer border. Gold was too bright, another cream was too light, and something darker than this brown would be too heavy.

OK, so this is looking quite nice.  Now for the binding.  Cream? Nope. Green? Nope. Red? No, it would be too much. What to use?

This batik is used in the spools on the body of the quilt itself. It has the golds, browns, greens and reds. It's perfect.


I also like that it isn't particularly prominent, but is interesting.

So that's it for the front. "What," I hear you asking, "might you use for the BACK?"


I thought you'd never ask!

Now you can see how the backing fabric informed my choices for the border on the front.

Monday, June 24, 2013

Spools, Redux

I've made all my spool blocks, and trimmed them all to size. (The Bali Pop strips were not exactly 2-1/2" wide, which was annoying.) I cleared the dining room to start laying out the blocks.

 I remembered Julie had said she laid hers out according to the magazine article where she found the design. I wasn't sure I'd do that, until I started moving the blocks around. There are eight different sized blocks.


I surrendered, and lay them out like the diagram in the magazine. I may make some minor adjustments, but for the most part, this is the way the flimsy will look. I will decide on borders later. I have THE COOLEST fabric for the backing of this quilt!


Saturday, June 22, 2013

Houses and Trees, Oh My!

My class at Quilted Threads was small, only four ladies, but they worked hard, asked good questions and did some great work.


This is Sharon's finished panel.
I love the fabric Sharon chose for the body of the house, and her mailbox is absolutely divine!

This is Sue's panel:
Sue wanted a house in the winter. She had forgotten a box of tools and fabrics at home, so we all lent her whatever she needed.

This is Lori's house.
Lori used vivid fabrics for her house, and then asked for help to choose the background. We brought several bolts of fabric to the classroom to try them all out and she selected this large print. I think it's terrific.

This is Kiersten's house.
Kiersten fixed the tree on the right (added some background fabric under the branches, then added another tree to the left of it. Later she will add stairs in front of the door.

The ladies asked very good questions, and kept me on my toes the whole day. They never settled for "the usual", but kept pushing ideas around until they got the results they wanted.


We all had a great day!


Thursday, June 20, 2013

Then Again, I Could Be an Idiot...

As you all know I'm planning my class at QT on Saturday. Yesterday I received one of QT's emails announcing upcoming events and classes. I read it and there was my class... "Houses and Trees, Oh My!" by Lynne Tyler on Saturday June 22...

WHAT???

I scrolled down... my letters class isn't scheduled at QT until Saturday August 3rd!

WHOOPS!!!

I started laughing. It's not a problem because my classes are all prepared well in advance. I'll bring different quilts of course, and I needed to print the handouts, but changing gears requires very little effort.

I'll be ready for Saturday, teaching free pieced houses, and now I'll have a great story to tell my students.

Letter Class Prep


I'm getting ready for the free-pieced letters class I'm teaching at Quilted Threads on Saturday.

I've gathered my tools, made a list of the quilts I'll be bringing, and updated my slideshow of letter quilts to show my students.

When taught the first class in October 2011, I brought my laptop and a projector with me, so I could show the students photos of letter quilts made by my blogging buddies, Tonya, Tanya, Julie, Brenda, Victoria, and many others. I didn't think anything of it, but the students were wowed, and the other teachers at QT told me they'd have "step up their game." I certainly hadn't meant to show anybody up, but I was very pleased when Becky told me I didn't have to bring a projector to class as the store had purchased one.

Students always have lots of questions, and a projector makes it easy to share the photos on my computer with the class.

Tuesday, June 18, 2013

Spools


My pal Julie had made a really cool spools quilt a year or so ago and I thought it would be a good way to use up the mashed potato cream fabrics I had left over.

Monday, June 17, 2013

A Quick Side Trip


I had to use up all those mashed-potato beiges and creams somehow. They wouldn't fit in the bookcse I use for my fabric storage. So I've got a little something in the works.  The blue-green batiks are part of a Bali-Pop I bought last year for a project that never went anywhere.

This is going to be a nice gift for somebody.

Saturday, June 15, 2013

Font Factory


The Font Factory is now a flimsy. I need to add a bit to the left, but it's done. This is a teaching quilt that shows how I construct the letters. I had originally considered adding goodies like asterisks and birds to this but I decided it would be too distracting.


** Brenda, Everybody tells me the A should be with the diagonals. But these letters are sorted based on how I think they are most efficiently constructed.  When I make my A's I start with the crossbar, and then add the angled pieces to either side.

Friday, June 14, 2013

A pair of Crayons


So I brought these two flimsies to work yesterday and hung them in my workspace.  Would you like to guess how many folks walked in and started commenting on how much they loved "this quilt?"

In other words... they all saw the black one and totally missed the light one on the right.

Yeah.


(In their defense, the quilts were hung in front of a large whiteboard.)


*PS. I suck at numbers. The Black Crayons measures 40" x 52" (not 30" x 52" as I mistakenly wrote the other day.)  The Mashed Potato version is 30-1/2" x 45"

Thursday, June 13, 2013

Progress!

I've made progress.
The contents of the two big bins have been sorted. One of the small bins holds strips 2-1/2" wide; the other 2". The large bin is full of pieces I want to keep, and now have to sort. I sat down when I got home from work and went through the two big bins quickly.

How did I do it? What criteria did I use? Check out this list:

Is it bigger than 1-1/2" square? Keep
Do I like it? Keep
Is it sewn to something else? Toss
Has it got a bias edge? Toss
Have I got it in a larger piece of fabric? Toss
Have I got six thousand pieces of this stuff already? Toss
Do I like working with it? Keep
Do I hate it? Toss
Might I use it? Keep
Have I got too damn much of it? Toss
Do I really love it no matter how little I have? Keep

Am I getting tired of this? Toss
I hate it. Toss
It's boring. Toss
ACK! More of this damn stuff... Toss
I don't know. Toss.
Have I used it in the last year? No. Toss
It's tacky. Toss


Can you see the bin I have marked in the photo below?


It is a bin full of stuff that was sewn to other stuff. I've had it for six years. It was a lot easier to sort through after I did the two bins on the table. How easy?


I feel SO much better.  I feel....


LIBERATED!

Tuesday, June 11, 2013

Save Me

You know you're in trouble when you have TWO worktables in your studio (one is 30" x 42" and the other is 37" x 52") and both are COVERED in fabric.  Actually as I was finishing the black crayon quilt, I had an empty space barely 18" 24" in which to work.

So naturally I was feeling very virtuous when I cleaned the large table, and sorted all the scraps and put them away in the bins.


Until I cleaned off the other table, the bureau, and the stack of fabrics piled on the chair nearby.

I was left with this...
 I have not one, but TWO, enormous bins full of scraps that need to be sorted.

And then all of that has to go here:

And can I tell you how irritated THIS makes me?

And I'd much rather be sewing than doing ANY cleaning. I have components of TWO quilts that can be put together, and I'd like to have both done by June 22, when I teach the free-pieced letters class at Quilted Threads in Henniker NH.

And of course, I have two more quilts in my head... and I have to write my speech for St Louis, finish reviewing the first draft of my book, rewrite certain sections of that, send a four letter word on a trip (very hush hush), reconcile the checkbook with the bank statement, figure out a way to get Millie to the vet for her checkup, make a top for my favorite cutie-patootie, plan travel arrangements, hotel and flights for what has become the St. Louis - Los Angeles trip, and OH, it's bedtime!

See ya!

Monday, June 10, 2013

Now You See It...

The Black Crayons flimsy is complete.

It measures 30" x 52"
 (I had to improve the contrast a bit since the black looked like grey in the photo.)

Here is the bland Crayons, for comparison.
Interseting, isn't it?

Sunday, June 9, 2013

Blackbird, black bird


This black bird came out of nowhere to take up residence on the Black Crayons quilt.

Saturday, June 8, 2013

Beeeee-cause!

OK!  I'll admit I want to make everybody work a little bit harder to read the letters in this version of the Crayons quilt. Having made each letter from one fabric however, limits my options for the remaining letters. I have to find appropriate fabrics for the letters I have left. It isn't easy, as you can probably tell.

I've had this Jane Sassaman fabric for a while. I like using very large prints for the backings of my quilts, but the quilt I was planning for this fabric grew too large, so I selected something else.

I knew that if I just made a letter out of this fabric without regard to the pattern the letter would be rather disjointed looking.  The letter B has curves, and this fabric has plenty of those.  How should I use them?  I didn't think the pink flowers would work well, and I knew the blue orchid would require too much cutting into the yardage. So I cut a couple of 2-1/2" strips crosswise and played with them.


I decided to use the leaves with the blue stems on either side of the lower "bowl".

I cut a piece of the same leaf and placed it on the bottom, underneath the black rectangle to look like a mirror image. Then I cut a piece on the bias to use in the corner. I didn't like that light area in the lower right corner, but a B is a curved shape, so I knew I could simply chop that out and make that corner suggest a curve.

Finding something to use for the upper part of the B was a bit trickier. I needed a longish, narrow piece of green.
I kept the top piece and the horizontal strip connecting the upper and lower parts of the letter in line with how I had used the fabric in other parts of the letter. That swirling green piece that connects to the blue is no accident.

Lastly I needed a long strip for the upright along the left side. The pattern on its own was a bit too big, so I did a bit of tinkering.


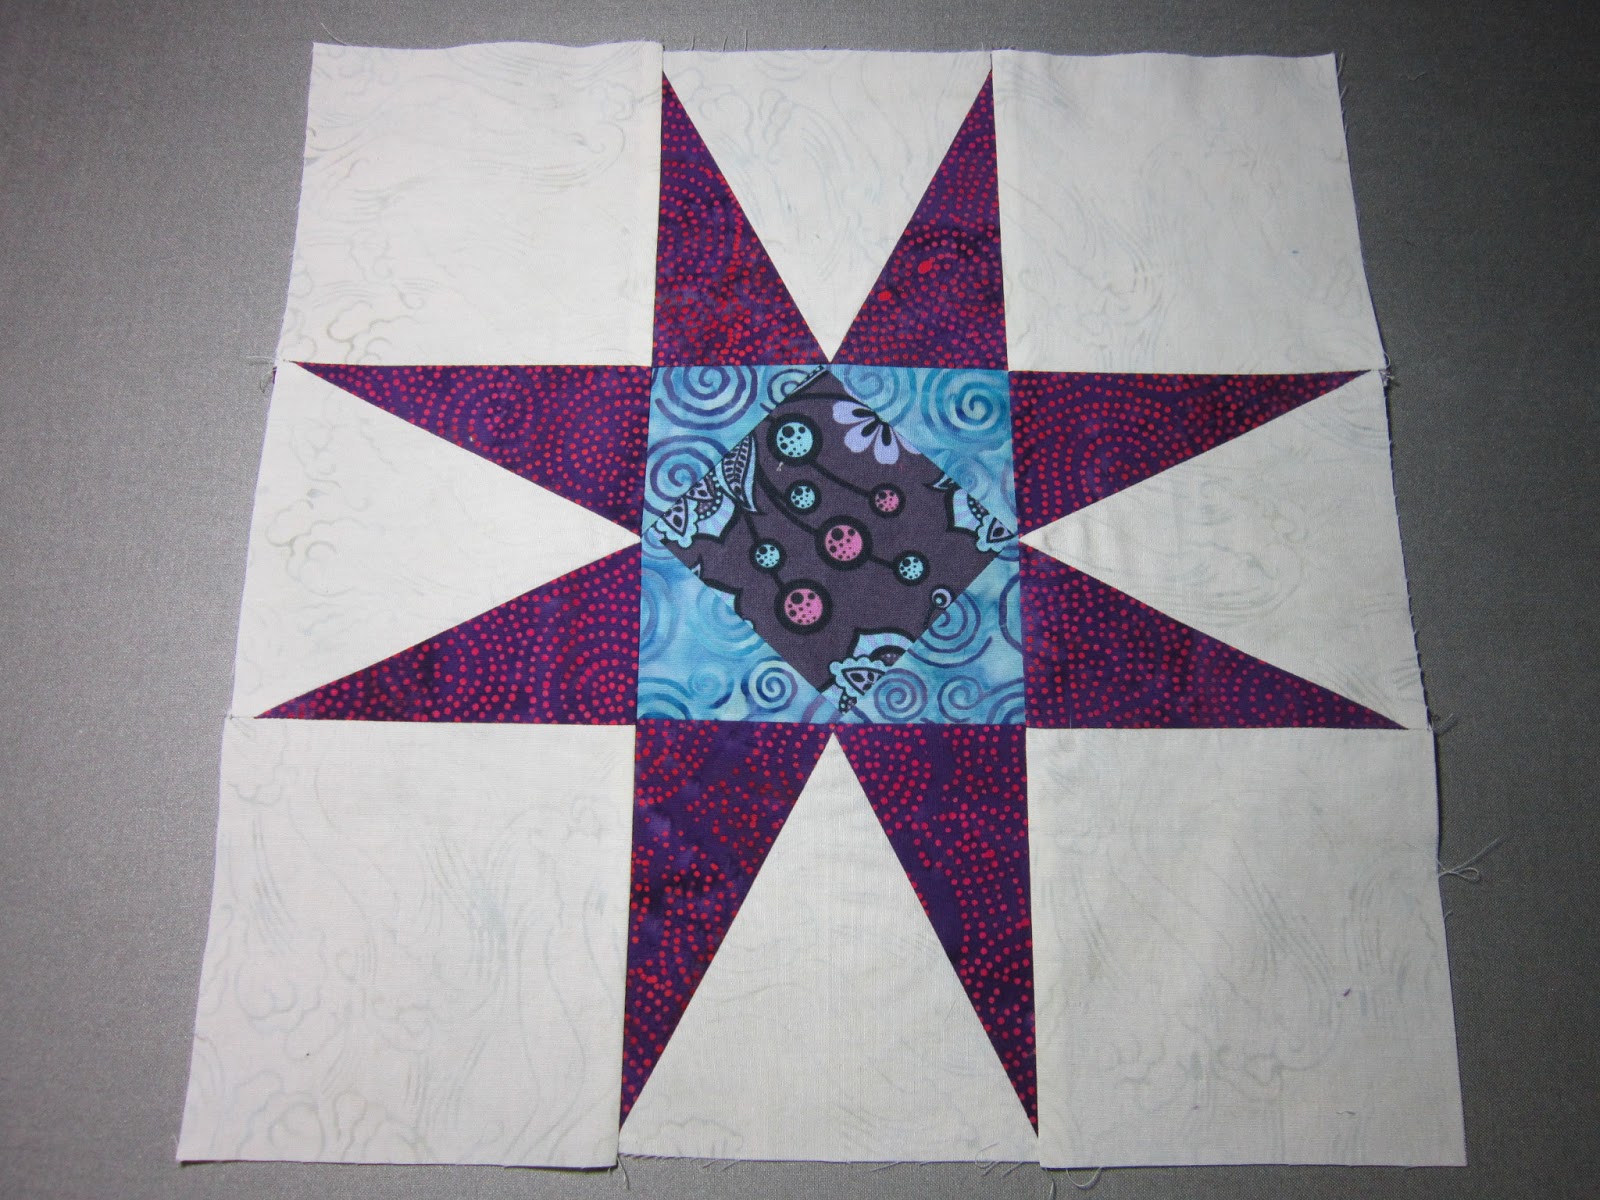
This is the finished letter B.

The pink dots on the left edge may disappear in the seam allowance when I sew the letter to the backing.

When I teach letter-making, the afternoon is devoted to teaching students to get the most out of their fabrics in this way.

Friday, June 7, 2013

O-migoodness


Brenda, you are right. These Black letters are hard to read. I think their readability will improve when they are completely surrounded by black fabric. However, this exercise is designed to push the boundaries of what is easy to see.

Thursday, June 6, 2013

More Black


I thought the ladies would make the "U" pretty special, but I am not sure the letter will "read" properly. All the other letters are made from one fabric, and this letter should be too. The fabric of the "S" isn't working. The design is too large and the rabbit is too distracting.  But you never know until you try.

I've been thinking a lot about WHY I like to make letters that make you look. I think it's because as an artist who loves to draw, I live in the land of subtle value changes.

Check out this Milton Glaser poster. It's called "Looking Is Not Seeing."

After I make this black version, there will be two more. One is the quilt "I" would make, using all colors, all values, using all the fabrics to their peak potential and including all my usual "inside jokes" and surprises. I'll make that one AFTER I make a "minimalist" version, which will include no color.

Oh I can't wait.

Wednesday, June 5, 2013

Not-So-Basic Black


I made some more black letters. I am really happy with these. I like the sheer unexpectedness of them. 

They will look so much better when completely surrounded by black. I haven't sewn any of these letters together yet.

Tuesday, June 4, 2013

Black is Back!


Here's another version of the Crayons, and this one will be made from fabrics with all black backgrounds. It is very similar in concept to the "low volume" quilts, but in reverse. I am very excited about this version too!

Heh.

Sunday, June 2, 2013

I used to know how to do this...

My best pal Julie has asked for stars for a quilt for her 60th birthday. So I thought, I can do one of those.


Oops. Apparently I have forgotten a great deal. (LOL!) And yes, I did this for each of the four blocks. I had to rip out all four seams. I really did know how to do this once.

This is okay, but I used the wrong colors! Too funny!

Fortunately Julie always finds something to do with the orphans I send her.


This one is better. I hope Julie likes it!