Tuesday, October 31, 2017

Colorado Quilt, Quilted


That's me (on the right) with Janet Lee Santeusanio of Woodland Manor Quilting, who quilted the Colorado Quilt. It is all hand guided free motion, and she did an outstanding job. Janet Lee brought it to me at Quilted Threads so my students could see it. This photo also shows just how big the quilt is.


.
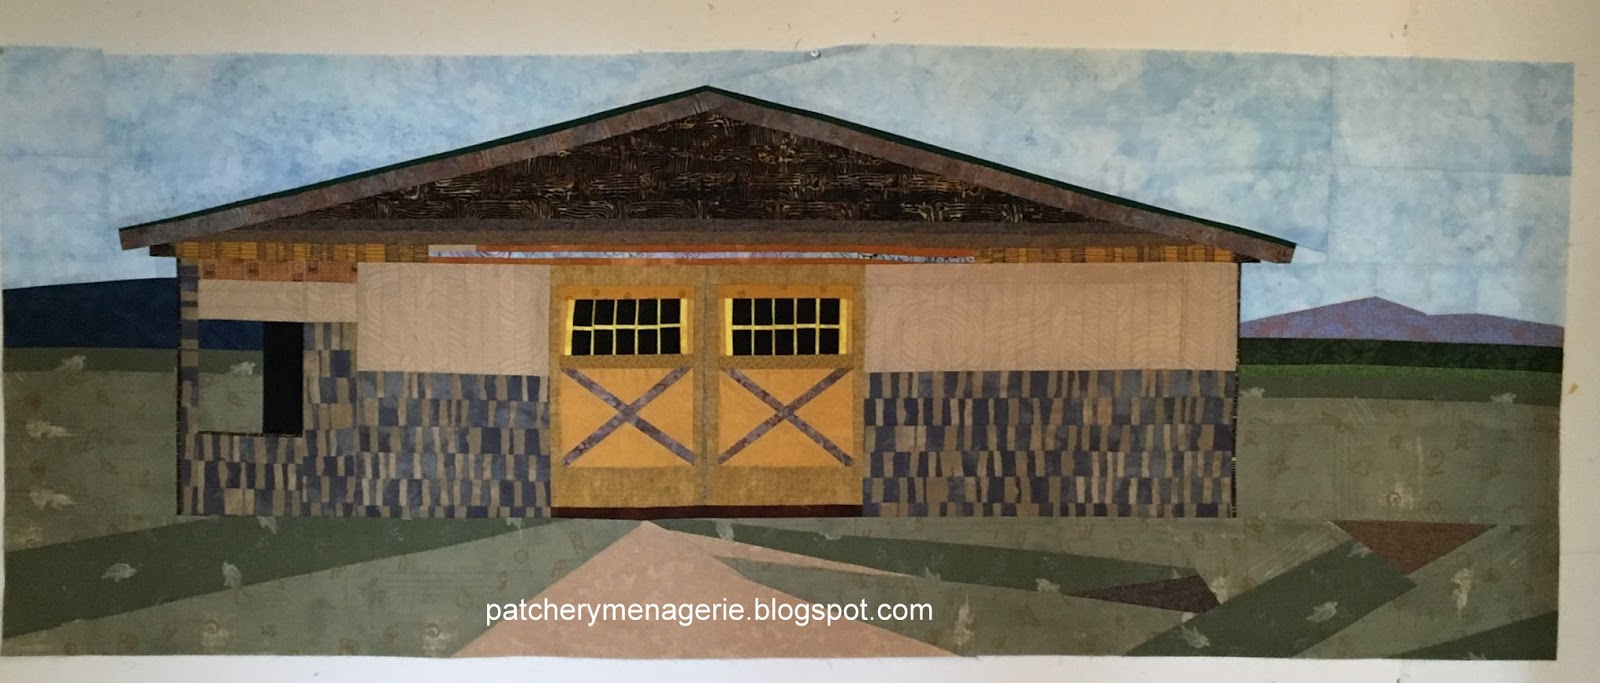
Here is a closeup of the quilting on the barn block. It's really spectacular. I particularly love the pebble quilting on the ground in front of the barn.

.
Here some of my students check out the signature panel on the back of the quilt.


Here's a detail shot of the quilting. You ought to be able to click on this photo to see a larger detail of the quilting.


I've chosen this warm grunge green as the binding for the Colorado Quilt.


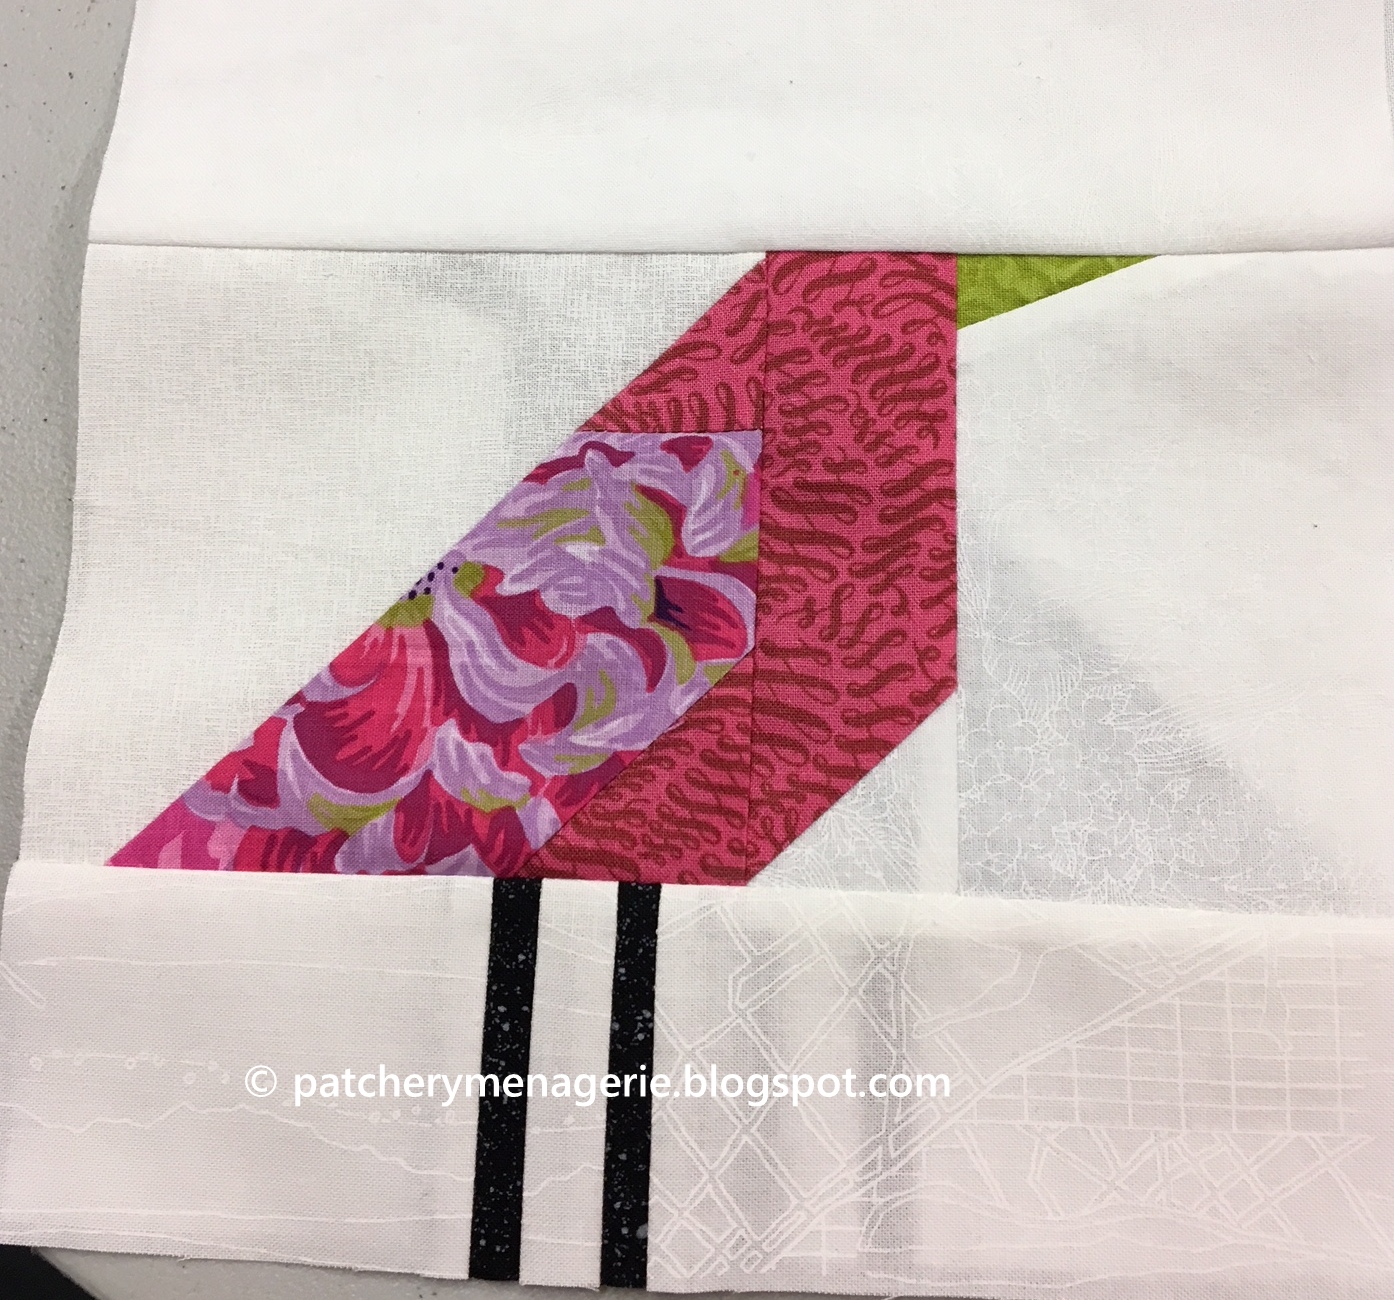
If you would like to make your own free pieced birds, you can get my bird tutorial here. Each bird represents something I saw in Colorado when I visited in June. (Scroll back through my blog to see each one in detail and what inspired it.)  I also have a tutorial to make the free pieced butterflies. I modified the flowers from the Old MacDonald Mystery Sampler Block Lotto and interpreted my brother's post and beam barn in Colorado into fabric using Julie Sefton's Build a Barn book as inspiration. As usual, the quilt is completely original and designed by me, Lynne Tyler, without the use of patterns, templates or paper piecing. There will  NOT be pattern for this quilt available, EVER. I am much more interested that you make your OWN quilts.

It's not that scary! Happy Halloween!

Sunday, October 29, 2017

Barn Builders

These were the lovely ladies in the barn building class at Quilted Threads on Saturday. They worked hard and had a great time. (That's Julie Sefton's quilt, See Rock City, behind them. One student remarked. "You know, I have the book, and looking at the pictures in the book, I thought the quilt was okay, but in real life, oh my god, that quilt is AMAZING!"  Yeah, that's why I think everybody in the area should make an effort to come by and see it.)

 .


 .


.


.

I love teaching. I hear the best things. One student said, at the end of the class. "I don't like my barn. It's not what I want." She looked at me and grinned. "Of course, this morning I didn't know what I wanted, and I didn't know how to do any of this, couldn't work without a pattern and didn't think I'd be able to finish. Now I know what I want and I know how to do it."

"So I guess that means it was a good day," I asked?

"Yeah, It was frustrating, but I learned a lot. It was a good class."

Bear in mind, all these students came in with photos of REAL barns they wanted to interpret in fabric, a task MUCH harder than simply building a generic barn.

After I demonstrated how to sew a 1/8" line one student looked at me and said, "Now that's a takeaway that was worth the cost of the whole class. And that's the SECOND one I've got so far." I felt pretty good hearing that, because it wasn't even noon.

It was also nice to have one student tell me, "You are a REALLY good teacher, and that's rare."

Yup. It was a good day for me too.


Friday, October 27, 2017

Barns!

I'm getting ready to teach the Barns class tomorrow at Quilted Threads, so I am gathering up all my stuff. The class is full, but QT always creates a waiting list so I will teach the class again later, probably after the Holidays.

I'm very excited because I'll have the Colorado quilt with me, and it will be quilted! I can't wait to see it. The quilter, Janet Lee Santeusanio of Woodland Manor Quilting, will be delivering it to me later today or at QT tomorrow, I don't know which yet.

Janet Lee wrote "... those birds and chickens are so flipping cute..."

You can see every bird I've ever made if you just look through the history of this blog. If you want to make your own birds, you can buy my tutorial, for sale on Etsy.


The barns were inspired by my friend Julie Sefton, who literally wrote the book on building free pieced barns, Build-A-Barn.  Julie's spectacular quilt, See Rock City, is on display at Quilted Threads. It's well worth a trip to QT to see this quilt in person.


And you may have noticed a new button on my sidebar. I'll be teaching a Birds class at the MQX show in Manchester NH next April. Registration starts November 15th.

Wednesday, October 25, 2017

More binding

I have sewn down the binding around half the Snow Day quilt, and pinned down the rest, so I am moving right along.


This is a detail of the Snow Day quilt. I've made it from scrap slabs. You can make a scrap slab triangle quilt too. Get my tutorial here at my Etsy shop.


In other totally non quilt related stuff, yesterday I celebrated 29 years of working at the same company.  Didn't see that coming 29 years ago. 

Monday, October 23, 2017

Loup de Lou

While watching Millie's pals, the guys named Pat, last night, I finished sewing the binding all around the third Scrap Slab quilt, Snow Day.

Now I can start sewing the binding down. Regular readers know I sew mine on the front of the quilt because I like it that way, and because my blindstitching is invisible. More information about that here.


If you are interested in making a Scrap Slab quilt of your own, you can buy my tutorial here.

Friday, October 20, 2017

In The Studio

I'm adding the binding to the Snow Day quilt, the third of the Scrap Slab Quilts. I want to have it ready for the class I'm teaching at Quilted Threads on November 11. The class is almost full. I've asked QT to distribute the tutorial to the students when they sign up so they can make some slabs at home and save the class time for the really fun creative part of making these quilts.

In preparation for the class I've had several copies of the tutorial printed and bound. I like to have these available for the students to reference during class.  I'm going to have to put a very ugly sticker on the front of them though, saying "Property of Lynne Tyler, please return at the end of class," because one student put one in her bag as she was getting ready to leave. I had to tell her I was sorry, but those were for class use only, and not for the students to take home.

You can purchase a copy of the tutorial here, at my Etsy shop, if you want to make your own scrap slab quilts!

Thursday, October 19, 2017

The Toy

When I visited my granddaughter in March, she threw this toy around, and I took this photo. I liked the colors.

I always thought these colors would make a great scrap slab quilt. When I was at Quilted Threads last Saturday, I chose these fabrics.
 

Yup, when the dust settles after Thanksgiving, I'll get started on the newest Scrap Slab Quilt.


If you'd like to know how these quilts are made, you can purchase my Scrap Slab Triangle Quilts tutorial here, at my Etsy shop.  Like the Birds, it is an instant download, so you can get started right away. I'll be teaching this class at Quilted Threads on Saturday November 11. There are a small number of spaces left, if you are interested in attending.


Tuesday, October 17, 2017

Mom's Busy


Nope, you're in the right place. This is me, Millie, and I have hijacked Mom's blog. She's been wicked busy the last few days - teaching and driving all over the place. She taught a very successful Birds class on Saturday, brought the Colorado quilt to be quilted on Sunday morning, and then she had dinner with a friend on Sunday night. Monday was crazy at work, and she's got to go to the teeth v-e-t today and there's a note on the calendar that says my teeth are being cleaned this week too. Well, we'll see about that.

Anyway, Mom's tired and she's gonna spend a few more days just chillaxing on the couch with her Kindle, and don't tell anybody, but I'll be curled up nearby getting scritches as she reads. She's been sewing the binding on the Snow Day quilt, and she bought fabric to bind the Colorado quilt when that comes back. She says she'll have it to show her Barn Building students at QT on October 28.


Thursday, October 12, 2017

Colorado Quilt Backing Done


While this may not be the best photo of the finished backing for the Colorado Quilt, this is very accurate in terms of color.  The backing is done and I will bring it to the longarm quilter on Sunday.

The signature block is 21-1/2"  wide by 32" tall. The lower case letters are 3" tall.

The blue straightedge in yesterday's post can be bought at Home Depot, here. Like anything long and straight, you have to be careful not to bend it so it will stay "true." It works for me and I am happy. It's only 20 USD, so it's a heck of a deal. You will want to find a place to store it.

More ruler fun here.

Wednesday, October 11, 2017

Back Back...

It's getting there...

I bet you thought this was going to be easy.

Nope. Although I want the signature panel to be at the lower edge of the quilt, I don't want it to be under the barn block, so I had to do some calculations to work out where to place it on the back.  The hard part is done though. Tomorrow I'll just sew a WOF (width of fabric) piece to either side of this center panel and I will be finished.

I'll be able to show the quilt to my students on Saturday and then I'll bring it to the longarm quilter on Sunday. I am hoping to have it back to show the Barn Building class at QT on the 28th (also full.) Then I'll add the binding (still to be determined), take beauty shots (because my brother sure won't), show it off to my family on Thanksgiving and then mail it to Colorado.

Time to start thinking of the next quilt!


Hey, Sue of the Monarch Quilter's Guild.... email me! The address is in the sidebar!


Tuesday, October 10, 2017

This and That


The signature panel is done. Now "all" I have to do is sew it into the backing. I'll get there. The last few days have been spent doing all the things I avoid doing when I am sewing. I prepared the Birds class I'll be teaching at Quilted Threads on Saturday, Oct 14th (It's full).

I worked out in the garden a bit on Saturday, pulling out weeds and dead plants in the so-called herb garden, and I dumped out some annuals I had in pots. They were past their prime. We haven't had a frost yet, so the perennial garden still looks good, and I won't trim it down until it's all dead.

I cleaned the house, did the laundry, vacuumed every room and washed the kitchen floor. I did the groceries and paid the bills, cleaned the litterbox and Millie's water fountain. I made bread and lunches for the week and had dinner with my dad and saw a movie (Battle of the Sexes, very good).

At any rate I want to have the backing ready so I can bring the quilt to Janet Lee for quilting next Sunday.

And oh yeah, I upgraded my iPhone. Now I have an iPhone 8.

Thursday, October 5, 2017

Options, Options...

I'm almost done the signature panel for the Colorado Quilt.

This one isn't right. The dark numbers make it too visually heavy on the right.

Too top heavy.

This is good. Doesn't take up too much space on the back of the quilt.

This is nice, almost the same as in the first bird quilt, Flight of Fancy, but I don't want it to take up so much space on the back of the quilt.

I have decided on the third one.


If you want to make your own flock of birds, get my tutorial here, on Etsy. It's an instant download, so you can get started right away.

Wednesday, October 4, 2017

Contrary

Last night I made the numbers 2-0-1-7 for the year and then sewed them together, then sewed my surname together. Tonight I'll finish the rest of the name panel, and assemble the backing for the Colorado quilt.

Oh, you are looking at the back of these panels. And yes, the back of every quilt I make looks just like these - neat, threads trimmed, pressed, and flat.


Tuesday, October 3, 2017

Signature Letters


I really want to get the Colorado Quilt quilted, so I am working on the signature panel for the back. I have made the letters of my name, and now I have to make the year - 2017. Then I will trim it all down to size and sew them together into a panel, then I'll assemble the backing.


If you'd like to make your own free pieced birds, click this link to my Etsy shop. The bird tutorial is an instant download so you can get started right away!


Monday, October 2, 2017

Interpretations

 Most free pieced barns are imaginary, or inspired by real barns. Most free pieced barns are not meant to be accurate representations, but when I saw my brother's barn in Colorado, I knew I had to make a free pieced barn based on it. I've been all over the country and never seen a barn like it. I think it's the most beautiful barn I have ever seen.

He designed and built it. It's post and beam construction, and he built it low on purpose, so as not to obstruct the view of the 14,000 foot mountains of Colorado that surround it.


When I make my free pieced barns (or birds, or anything else I make that way) I don't measure with a ruler, I measure by eye. It's a skill I learned while learning how to draw. I know I'm good at it, but sometimes it surprises me. When I put the picture of my free pieced barn next to a picture of my brother's barn, I was amazed I got the scale and general proportions just right. I also didn't want to clutter up the design with the bins and planters, picnic table, furniture, grill or gates. I knew that those elements could clutter up and obscure what I meant to be the central focus - the barn.

I didn't want to make an exact representation, but I wanted my barn to be close enough so you'd know which barn inspired it. As in all such interpretations, decisions have to be made about what to include and what to leave out, and what fabrics to use to suggest the original. Fabric choices were based on what fabrics I had in my stash, and what were available to purchase, so I did the best I could.

I was very happy with the way the barn turned out.

Sunday, October 1, 2017

Concord Piecemakers

These are the ladies of the Concord Piecemakers who took the Bird workshop on Saturday. They had a grand time. Can you tell these ladies have a lot of personality? (hint: look closely at their faces)

Here are some of the birds they made.